How to Insulate a Shipping Container Home to Prevent Condensation and Heat Loss
Updated September 26, 20267 min read
On This Page
Somewhere around two in the morning, a lot of new container home owners get the same unpleasant introduction to their build: water on the ceiling that has nothing to do with the weather outside. It drips onto the mattress, pools along a seam, sometimes just shows up as a damp smell that wasn’t there the night before. First-time owners often assume the roof is leaking. It usually isn’t. What they’re seeing is called container rain, and it happens inside a sealed steel box the moment warm, humid air meets a surface cold enough to pull the moisture back out of it.
According to USA Containers, a supplier that has written extensively about the phenomenon, three conditions combine to cause it: a wide swing between day and night temperatures, humidity trapped inside a mostly sealed structure, and little or no airflow to carry that moisture back out. Steel does not help matters. A container wall has almost no thermal mass to speak of, so it tracks the outside temperature closely, turning into a cold plate at night even when the air inside is still warm from the day. That mismatch is where the water comes from.
None of this is a reason to avoid a steel structure. It’s a reason to insulate it properly before anyone tries to live inside it. What follows is less about which product to buy and more about the physics that decide whether it works.
Why a Steel Box Behaves Differently Than a Stick-Built Wall
A conventional wood-framed wall breathes a little. Vapor moves through it slowly, and most codes assume some of that movement will happen no matter what you do. A container is closer to a sealed can. The corrugated steel skin that gives it strength on a ship is also what makes it airtight enough that any moisture generated inside, cooking, showering, even breathing, has nowhere obvious to go unless the insulation system is built to manage it.
That’s the detail a lot of first-time builders miss. They treat container insulation as a copy-paste job from a normal house, picking whatever batt insulation was cheapest at the local supplier, stapling it between furring strips, and calling it done. Discover Containers, a container home education resource, points out that most containers are built from COR-TEN steel, a weathering alloy that develops a thin protective rust layer when it cycles between wet and dry conditions. Trap constant moisture against that steel with a poorly sealed insulation job, and you remove the dry half of that cycle. The steel stays wet, the protective layer never fully forms, and corrosion starts from the inside where nobody can see it until the wall is already compromised.
Comparing the Insulation Methods That Actually Get Used
Builders tend to land on one of four approaches, and each one trades cost against performance in a different place.
Method
Typical R-value
Vapor barrier included
Where it tends to make sense
Closed-cell spray foam
Roughly R-6 to R-7 per inch
Yes, when applied correctly
Extreme climates, roofs, anywhere condensation risk is high
Open-cell spray foam
Roughly R-3.4 to R-4 per inch
No, remains vapor permeable
Interior walls in milder climates, budget-conscious builds
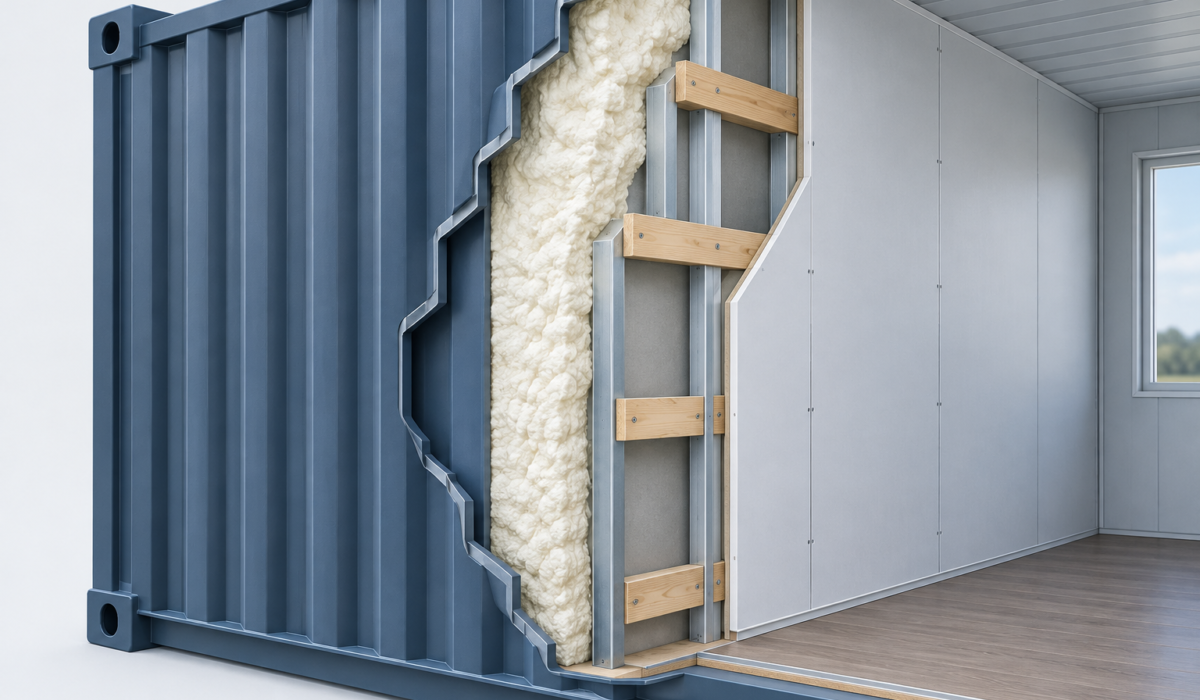
Attainable Home, a building resource focused on alternative housing, notes that installers typically apply closed-cell foam about two inches thick on walls for roughly R-13, and three inches on roof sections to reach closer to R-19, since roofs lose more heat and take the worst of the sun and rain over time. Conexwest, a container supplier that publishes detailed comparisons for its customers, lists closed-cell spray foam as the strongest all-around performer specifically because it does two jobs at once: it insulates and it forms a continuous air and moisture seal in a single application, which matters more inside a steel shell than it does inside a house with a vapor-open wall assembly.
Fiberglass and rigid foam are not bad choices. They’re simply choices that put the vapor-control decision on the builder rather than the product. Skip that step, and Attainable Home’s own caution applies: fiberglass in particular can hold moisture against the steel if it isn’t backed by a proper barrier, turning what looks like a normal, familiar material into the exact condition that causes hidden rust.
Matching the Method to the Climate, Not the Marketing
A container sitting in a mild coastal climate with small day-to-night temperature swings is a very different insulation problem than one in the desert Southwest, where surface temperatures can swing more than fifty degrees between noon and 4 a.m. Conexwest frames it plainly: a workshop in a mild region can often get by on basic panel insulation, while a home in a place like Arizona needs closed-cell foam paired with a real vapor barrier because the swings are simply too large for anything less.
Cold, humid climates carry their own version of the same problem. The bigger the gap between the warm, moist air people generate just by living in a space and the cold steel holding it in, the more aggressively that moisture needs to be stopped before it reaches the wall. This is also why ventilation belongs in the same conversation as insulation, not a separate one. Even a well-insulated container still needs somewhere for residual humidity to go, whether that’s a bathroom exhaust fan, a range hood, or a whole-house ventilation strategy sized for the space. Insulation slows heat transfer. It does not, by itself, remove moisture that’s already indoors.
Builders working across a mix of climates sometimes try to split the difference, spraying foam on the roof where the risk is highest and using cheaper batt insulation on the walls to save money. That approach can work, provided the transition between the two materials is sealed carefully. A gap where roof foam meets a wall’s vapor barrier is exactly the kind of small oversight that turns into a slow leak of warm air into a cold cavity, and slow leaks of warm air into cold cavities are where condensation problems usually start.
Five Mistakes That Show Up Again and Again
Skipping the roof. Builders often insulate the walls carefully and treat the roof as an afterthought, even though it absorbs the most direct sun and loses the most heat at night.
Stopping at the studs. A furring strip wall with insulation between the framing but none in front of the steel itself creates a thermal bridge, a strip of bare, poorly insulated metal running through the wall that conducts heat straight through regardless of what’s between the studs.
Treating vapor barriers as optional. Fiberglass and rigid foam both need one. Leaving it out to save a weekend of labor is the single most common reason condensation problems show up eighteen months after move-in instead of on day one.
Ignoring the floor. Heat and moisture move through the container floor too, especially over a concrete pad or an uninsulated crawlspace, yet it’s the section owners are most likely to overlook because it’s out of sight.
Assuming paint solves it. Ceramic insulating paints and coatings exist and can help marginally with corrosion resistance, but Design Ideas for the Built World is careful to note that their actual insulating value has been questioned. Treating a coating as a substitute for real wall insulation tends to backfire the first time a serious cold snap or heat wave hits.
Reading the R-Value Claims With Some Skepticism
Container and insulation sellers routinely advertise numbers that sound better than the material behind them, and a healthy amount of doubt is warranted before taking any single-source claim at face value. Independently reported figures for polyurethane spray foam generally land in the R-3.4 to R-7 per inch range depending on density and whether it’s open or closed cell, not a flat number that applies to every product with “spray foam” on the label. When a listing promises a dramatically higher figure than that range, a fair question is what conditions the number was tested under, and whether it reflects the installed assembly or just the material in isolation. The gap between a lab number and a real, field-installed wall is often where disappointment comes from later.
Where This Leaves You
There’s no single right answer here so much as a right question: given this climate, this budget, and this roof, what actually keeps moisture off the steel while keeping the space livable. Closed-cell spray foam earns its higher price tag in harsh climates and on roofs specifically because it insulates and seals in the same step. Fiberglass and rigid foam can work perfectly well everywhere else, provided the vapor barrier and ventilation get treated as part of the job rather than optional extras. Get that sequencing right before drywall goes up, because once the wall is closed, the only way to find out it was wrong is the hard way, at two in the morning, with a bucket.